使用代理github
socks5协议,10808端口修改成自己的本地代理端口
1
| git config --global http.proxy socks5://127.0.0.1:10808
|
1
| git config --global https.proxy socks5://127.0.0.1:10808
|
http协议,10809端口修改成自己的本地代理端口
1
| git config --global http.proxy http://127.0.0.1:10809
|
1
| git config --global https.proxy https://127.0.0.1:10809
|
只是加速GITHUB , 其他保持不变
http协议
1
| git config --global http.https://github.com.proxy https://127.0.0.1:10809
|
1
| git config --global https.https://github.com.proxy https://127.0.0.1:10809
|
socks5协议,1080端口修改成自己的本地代理端口
1
| git config --global http.https://github.com.proxy socks5://127.0.0.1:10808
|
1
| git config --global https.https://github.com.proxy socks5://127.0.0.1:10808
|
解除代理
1
| git config --global --unset http.proxy
|
1
| git config --global --unset https.proxy
|
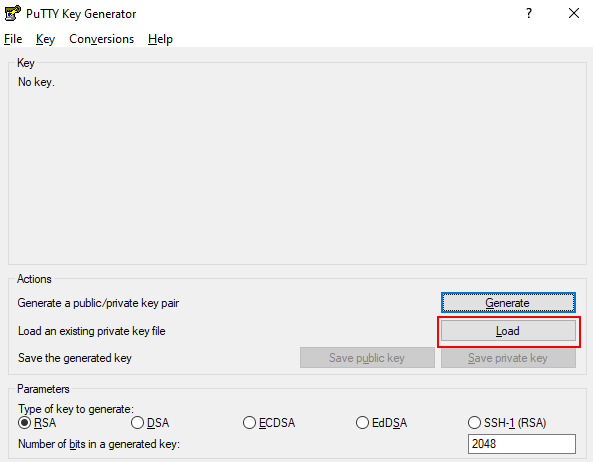
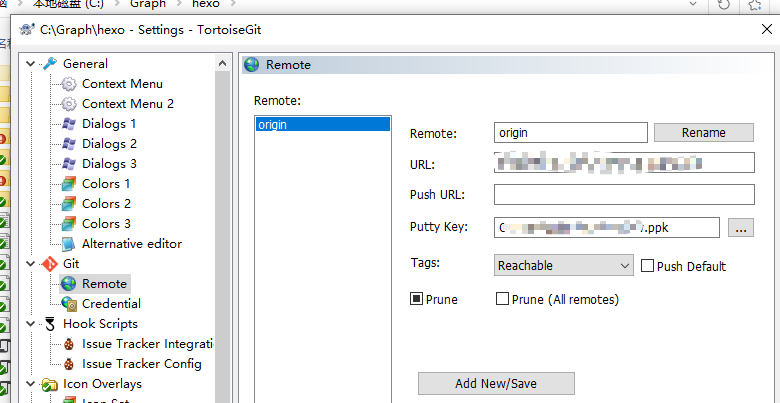
tortoiseGit的SSH Client设置
搜索到PuttyGen程序,单击“Load”按钮,如下图所示
选择用户的公私钥目录下的“id_rsa”文件,然后单击“打开”按钮

单击“确定”,再选择“Save private key”,如下图所示
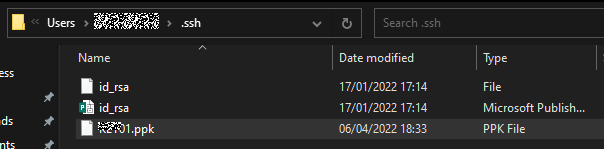
生成的文件添加到这儿
## 链接不上
1.22端口拒绝的话,可以在.ssh目录下设置文件config,内容如下
1
2
3
| Host github.com
Hostname ssh.github.com
Port 443
|
2.链接不上的话,直接在network里设置ssh代理程序,使用git的ssh程序
1
| C:\Program Files\Git\usr\bin\ssh.exe
|
git命令
查看当前版本
windows下更新git
1
| git update-git-for-windows
|
1
2
3
4
5
6
7
8
9
10
11
12
13
14
15
16
17
| git status **查看目前状态**
git status -s
git diff **查看工作区跟缓冲区的改变**
git diff --cached **查看缓冲区和上个版本区别**
git diff head **查看工作区、缓冲区和上个版本区别**
git commit -m 'fff'提交
git checkout 文件名 将缓冲区还原到工作区
git reset 版本还原到缓冲区
git branch 查看当前分支
git branch -d 分支 //删除分支
创建新分支并立即切换到新分支:$ git checkout -b [name]
合并分支(保留分支的commit):
git checkout master//master为空则clone,不然切换到master分支
git merge dev//把dev分支的东西合并到master上
在主分支上应该可以只显示子分支的提交,可百度:
git merge dev --no-ff 用这个
|
生成key
1
| ssh-keygen -t rsa -C "13436472835@163.com" -f ~/.ssh/github_snow
|
更安全的
测试连接
1
| ssh -T git@github.com –p 22
|
1
| ssh -T git@bitbucket.org –p 22
|
指定秘钥测试
1
| ssh -i ~/.ssh/github_snow -T xuezchuang@github.com
|
多秘钥配置
github有时候不能布置,算求了..生成秘钥
为了兼容tortoisegit,在Network替换为如下.否则要生成多秘钥还有时配不全
1
| C:\Program Files\Git\usr\bin\ssh.exe
|
设置代理,设置哪个网站使用那个秘钥
删除缓存的密钥
把以下秘钥加入缓冲中
1
| ssh-add ~/.ssh/id_rsa_xxx
|
进入到.ssh目录中,配置config文件
1
2
| $ cd ~/.ssh
$ touch config
|
config文件直接编辑器输入.对应个网站采用哪个私钥
1
2
3
4
5
6
7
8
9
10
11
| Host github.com-foo
HostName github.com
User git
IdentityFile ~/.ssh/id_foo
IdentitiesOnly yes
Host github.com-bar
HostName github.com
User git
IdentityFile ~/.ssh/id_bar
IdentitiesOnly yes
|
更新所有远程分支
git remote update origin --prune
git remote update origin -p
取到别的分支提交的代码
git cherry-pick
查看git操作日志
git reflog //查看仓库指令
标签:可当做commitid使用
git tag v1.2 创建标签,后可加commitid
git tag 查看所有标签
git tag -d v1.2删除标签
配置别名:
1
2
3
4
5
| git config --global alias.st status以后可用git st 代替git status
git config --global alias.br branch
git config --global alias.ci commit
git config --global alias.co checkout
git config --global alias.lg "log --color --graph --pretty=format:'%Cred%h%Creset -%C(yellow)%d%Creset %s %Cgreen(%cr) %C(bold blue)<%an>%Creset' --abbrev-commit"
|
查看配置:
1
2
3
4
5
6
7
8
9
10
11
12
13
14
15
16
17
18
19
20
21
22
23
24
25
26
27
28
29
30
31
32
33
34
35
36
37
| cat .gitconfig
git config --list //查看配置
方式一:
.gitconfig文件windows下在C:\Users\xue里面下:
[user]
name = xue
email = xuezc@midasit.com
[core]
excludesfile = E:/11.txt //默认的忽略配置文件
可直接写:git config --global core.excludesifle /e/gitignore.txt
方式二:
直接在仓库目录下写:
vim .gitignore在里面配置文件
SSH配置:
ssh-keygen -t rsa 生成ssh公私钥
cat ~/.ssh/id_rsa.pub 查看公钥
ssh -T git@github.com 链接github
//使用远程仓库
remote add origin SSH
git push -u origin 分支
git fetch origin //更新远程代码带本地 后可加分支
git branch -a 可显示远程所以分支
git fetch -p //在fetch之后删除掉没有与远程分支对应的本地分支:
git branch 分支 远程分支
git branch -m 分支 分支 //更改分支名字
创建远程分支(本地分支push到远程):$ git push origin [name]
git push origin :branch-name //删除远程分支
|
可删除哈希id
1
2
3
| 首先确保所有分支都没有引用(包括tags)该提交,包括HEAD也不指向这个提交。
然后 git reflog expire --expire=now --all (这会清除分支变更历史)
然后 git gc --prune=now (不用调整时间,加上--prune=now命令即可)
|
1
2
3
4
5
6
7
8
9
10
11
12
13
| 忽略*.o和*.a文件 *.[oa]
忽略*.b和*.B文件,my.b除外
*.[bB]
!my.b
忽略dbg文件和dbg目录
dbg
只忽略dbg目录,不忽略dbg文件
dbg/
只忽略dbg文件,不忽略dbg目录
dbg
!dbg/
# 只忽略当前目录下的dbg文件和目录,子目录的dbg不在忽略范围内
/dbg
|